Restaurant Launch Checklist: Every Setting Before Your First Scan
By menu-MENA Team
Published on September 14, 2026
The six boxes on your dashboard
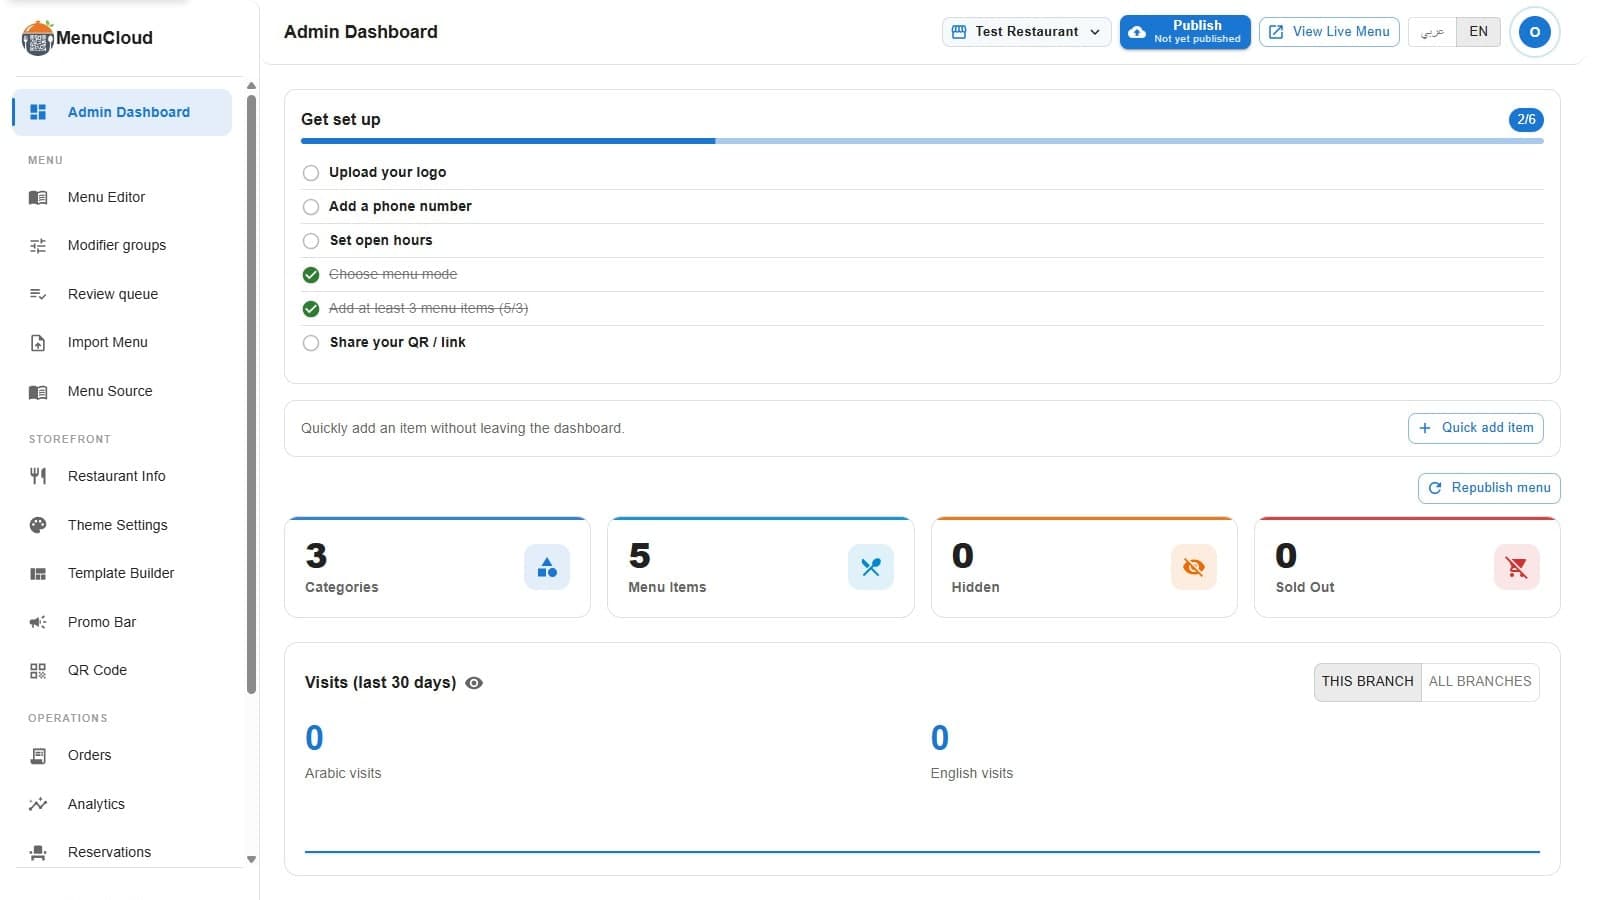
Log into a new menu-MENA account and the first thing on the Admin Dashboard isn't a chart or a menu item. It's a card titled "Get set up," with a chip next to the title showing your progress (something like 2/6) and a thin progress bar underneath. Six lines follow it, each with a checkmark or an empty circle: upload your logo, add a phone number, set open hours, choose menu mode, add at least three menu items (or upload your PDF), and share your QR or link. Every line is a real link to the page where you do that thing, not a static to-do list you have to go find on your own.
The card isn't decoration. Each item reads a real field on your account. The logo line checks whether a logoUrl is actually set on your restaurant record. The phone line checks whether your contact info has at least one number saved. The hours line runs your saved schedule through the same normalizer the public menu page uses to decide whether to show "open now" or "closed," so if that line is unchecked, your live menu doesn't have a working hours badge yet either.
Restaurant info first: logo, phone, hours
The first three items all point to the same page, Restaurant Info. That's deliberate. Your logo shows up in the header of your public menu and in the middle of your QR code once you set one there. Your phone number is what a customer taps to call you directly from the menu page. And your hours aren't just a label, they drive the live open/closed state visitors see. Setting hours once so your menu never shows "Open" at 2 A.M. covers what that schedule controls beyond this one checklist line.
None of these three block anything. You can go live with no logo and no listed hours. The checklist just makes sure you notice the gap before a customer does.
Choosing your menu mode
The fourth item, "Choose menu mode," is really asking you to pick between two different ways of showing your menu: Templates or PDF. Templates mode means you build categories and items in the Editor, and menu-MENA renders them as a real page with search, modifiers, dietary labels, and sold-out toggles. PDF mode means diners see your existing PDF as a flipbook instead. Whichever you pick, the other mode's data doesn't get deleted, it just sits paused. The switch-mode confirmation dialog says exactly that: the inactive mode's data is preserved and reappears if you switch back.
Getting to three items, or uploading a PDF
In Templates mode, the fifth checklist line reads "Add at least 3 menu items," with a live count next to it. It flips to checked at exactly three items, not before. The fastest way past this one usually isn't typing every dish by hand: menu-MENA ships with a pre-built bilingual catalog of over 1,100 items, so most Egyptian and MENA restaurants can pull in dishes that already exist in Arabic and English and just adjust prices, instead of writing translations from scratch.
In PDF mode, this same line changes its label to "Upload your PDF menu" and its destination to the upload screen. Worth knowing: that line stays unchecked in PDF mode no matter what, even right after a successful upload. It's a limitation of how the line is built, not a sign anything failed. If your PDF flipbook shows up on the live menu, you're fine even with that box unticked.
Sharing the QR
The sixth and last item, "Share your QR / link," behaves differently from the other five. It never checks itself off, no matter what you do. There's no way for the dashboard to know whether you printed the QR code, put it on a table tent, or sent the link over WhatsApp, so it stays live as a reminder rather than a task with a real finish line. The QR Code page is where you'd generate it, with your own logo dropped into the center and your brand colors set on the eyes and frame, then export a print-ready table tent, sticker, or poster sized in millimeters for real paper.
What "complete" actually looks like
Finish all six and the card itself changes shape. Instead of a progress bar, you get a green-bordered card reading "Setup complete, your menu is ready to share with customers," with an X to dismiss it. Click that X and the card is gone for good on that browser, the dismissal is saved to local storage. If you haven't dismissed it and later undo one of the six things, say you clear your saved phone number, the card comes back with an honest count.
First-time users also see a one-time welcome popup with three simpler steps: make it yours, add or edit your menu, share it. It only shows once, though clearing your browser data brings it back. The dashboard checklist underneath it covers the same ground and sticks around for as long as you actually need it.
Before your first real scan
None of these six settings block you from going live. You can generate a QR code with an empty menu and it will work, it will just say so. The checklist exists because the gap between technically live and actually ready for a customer to scan is usually five minutes of work you'd otherwise forget: a phone number, real hours, a logo, three items. Clear the list once, and the only thing left before you hand someone a QR code is deciding where to print it.